

Custom remote connectors let you extend Perplexity by connecting it to additional data sources and tools beyond the built-in (first-party) connectors. With the Model Context Protocol (MCP), you can integrate Perplexity with virtually any compatible service, whether it runs locally on your machine or on a remote server.
Adding Custom Remote Connectors
Organization members can add custom remote connectors if admins enable them for the organization.
How you add a remote connector depends on whether an admin adds it for the entire organization or a user (including admins) adds it for their own account.
In both cases, the steps are largely the same. The main difference is that only admins can share connectors with the entire organization.
Hot to Add a Remote Connector
Navigate to the correct settings page:
For your account: Account settings → Connectors
For the organization (admins only): Enterprise settings → Permissions → Connectors permissions
Click + Custom connector in the top-right corner.
In the modal pop-up, select Remote.
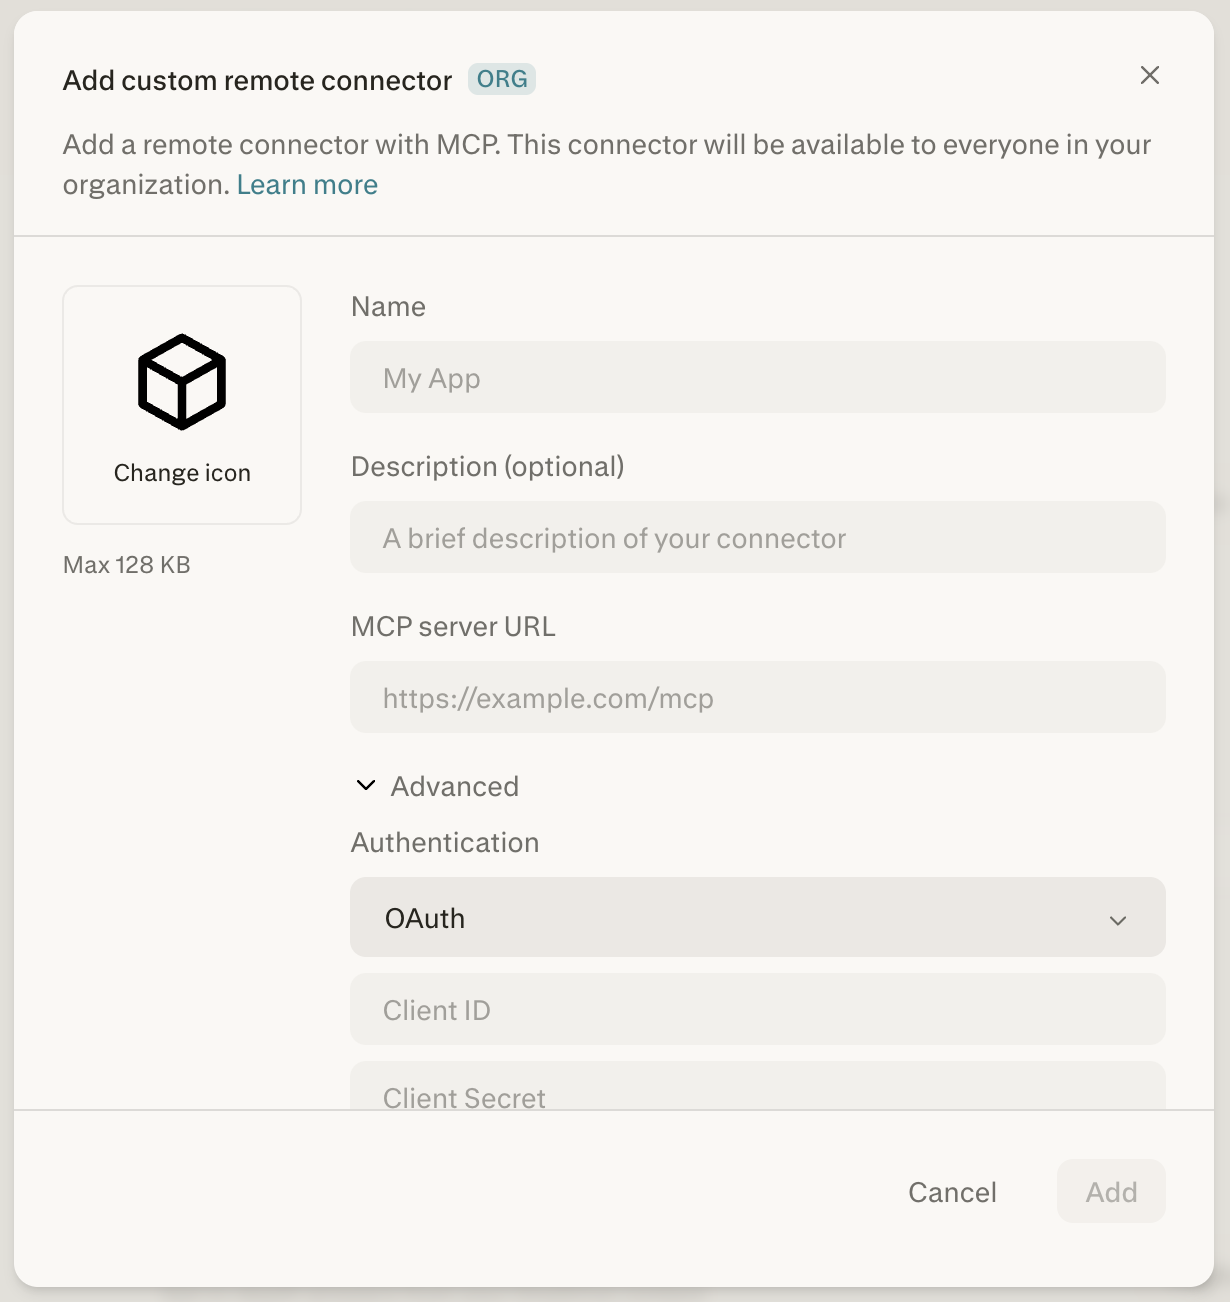
Fill in the required fields:
Name — A display name for your connector (e.g., “Acme CRM”).
MCP Server URL — The URL of the remote MCP server (e.g.,
https://myapp.com/sse). HTTPS is required.
Optionally, fill in these additional fields:
Description — A short explanation of what the connector does.
Authentication — Choose between OAuth, API Key, or None (see the Authentication section below).
Transport — Choose between
Streamable HTTPorSSE.Icon — Choose an icon for the connector. Note: Maximum image size is 128 KB.
Check the acknowledgement box to confirm you understand the risks of custom connectors.
Click Add. The connector will appear in the Connectors screen in your Account settings.
Click the connector card to start the authentication flow and enable it. To modify or remove the connector later, click the ellipsis (⋮) and choose the appropriate option.
Organization-wide connectors added by admins may not appear right away for other organization members.
The connector creator must share the connector with the organization from the Permissions screen in Enterprise settings before others can access it.
Authentication Options
Remote custom connectors support three authentication methods:
None — No authentication required. The MCP server is accessible without credentials.
API Key — Authenticate using a static API key provided during setup.
OAuth 2.0 — Authenticate using the OAuth 2.0 protocol. You may need to supply a Client ID and Client Secret if the MCP server does not support dynamic client registration. If the server supports OAuth discovery (via
/.well-known/oauth-authorization-server), endpoints and scopes can be detected automatically.
For organization-scoped connectors with OAuth, an admin can authenticate once on behalf of the entire organization, or require each member to authenticate individually.
Custom connector OAuth redirect URL
When you create an OAuth application in an external system for a custom connector, the callback/redirect path is always /rest/connections/oauth_callback.
The redirect URL to register is: https://www.perplexity.ai/rest/connections/oauth_callback
For organizations on the Enterprise subdomain, use: https://enterprise.perplexity.ai/rest/connections/oauth_callback
Cloudflare Access (Network access)
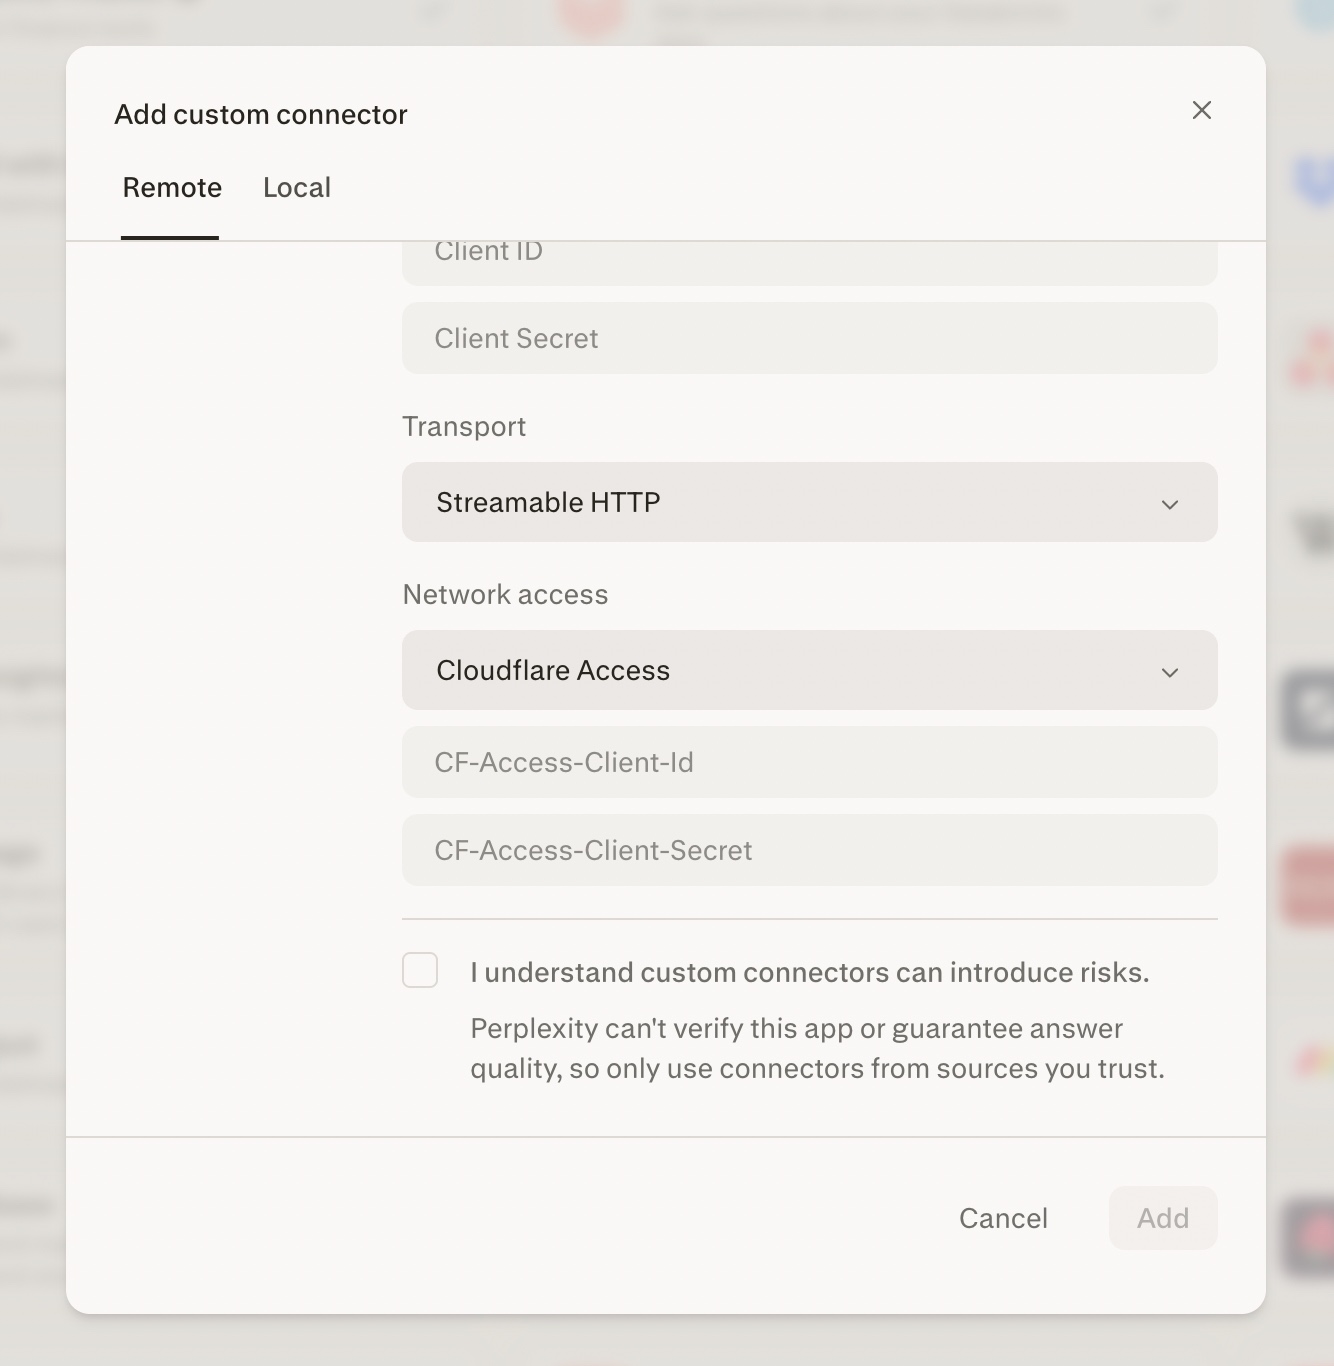
If your remote MCP server sits behind Cloudflare Access, you can authenticate Perplexity to your zero-trust edge before any application-layer auth runs. This is configured through the new Network access dropdown on the + Custom connector form.
What admins can do
Add a remote MCP server that lives behind Cloudflare Access by selecting Cloudflare Access in the new Network access dropdown on the + Custom connector form.
Paste in their
CF-Access-Client-IdandCF-Access-Client-Secret(both required) — Perplexity injects those headers on every request, including the create-time verification probe and every runtime tool call, so a clearly bad token fails at verification rather than silently later. See the troubleshooting notes below for cases where verification succeeds but runtime calls return 403.Stack this with normal app-layer authentication (OAuth, API Key, or None) — for example, PayPal’s pilot uses Cloudflare Access headers and OAuth together.
Header values are stored encrypted and redacted in the UI, following the same handling path as other connector secrets.
Header names are case-insensitive but the keys must be exact:
CF-Access-Client-IdandCF-Access-Client-Secret.
Configuring the Cloudflare side
Cloudflare Access requires a one-time setup in your Cloudflare Zero Trust dashboard before Perplexity can connect.
Create a service token. In your Cloudflare Zero Trust dashboard, go to Access → Service Auth → Service Tokens and create a new token. Copy the Client ID and Client Secret immediately — the secret is shown only once.
Create an Access application for your MCP server’s hostname. Use the Self-hosted application type and point it at the public hostname Perplexity will call.
Add a policy with Action = Service Auth. In the application’s policy, set Action to Service Auth (not Allow) and include the service token you created in step 1.
Common misconfiguration: Choosing Allow instead of Service Auth makes Cloudflare expect an interactive browser login and reject non-browser requests, so the Perplexity verification probe will fail. Service Auth is the correct action for machine-to-machine access via service tokens.
Tip: If the connector saves successfully, the verification probe authenticated through Cloudflare Access — the auth path is working end-to-end.
Troubleshooting: verification or tool calls return 403
If the connector fails to verify, or it verifies successfully but tool calls return 403 at runtime, work through these in order:
Incomplete or expired token. Re-paste the full Client ID and Client Secret — the secret field is long and partial pastes are easy to miss. Service tokens also have an expiry (default 1 year); re-issue the token if it has expired.
Wrong policy action. The Access policy must use Service Auth, not Allow or Bypass. See the configuration steps above.
Propagation delay. Newly created Access applications, policies, and service tokens take a few minutes to propagate across Cloudflare’s edge. If verification fails immediately after setup, wait a few minutes and retry before assuming a misconfiguration.
WAF or Bot Management challenge. Perplexity connects from datacenter IP ranges. If your Cloudflare zone challenges automated traffic, the MCP endpoint may receive a Managed Challenge that a machine client cannot solve — this surfaces as a 403. Add a WAF skip or Bot Management exception for the MCP hostname. This is safe because Cloudflare Access still gates the endpoint via the service token.
If all of the above check out and the connector still fails, the issue is likely on the application layer (the MCP server itself), not Cloudflare Access.
Sharing and Permissions
Custom connectors can be scoped in two ways:
Individual — The connector is private to the user who created it. Only that user can see and use it.
Organization — The connector is shared with all organization members (remote connectors only). Only admins can share connectors organization-wide.
Admin Controls
Organization admins have additional management capabilities:
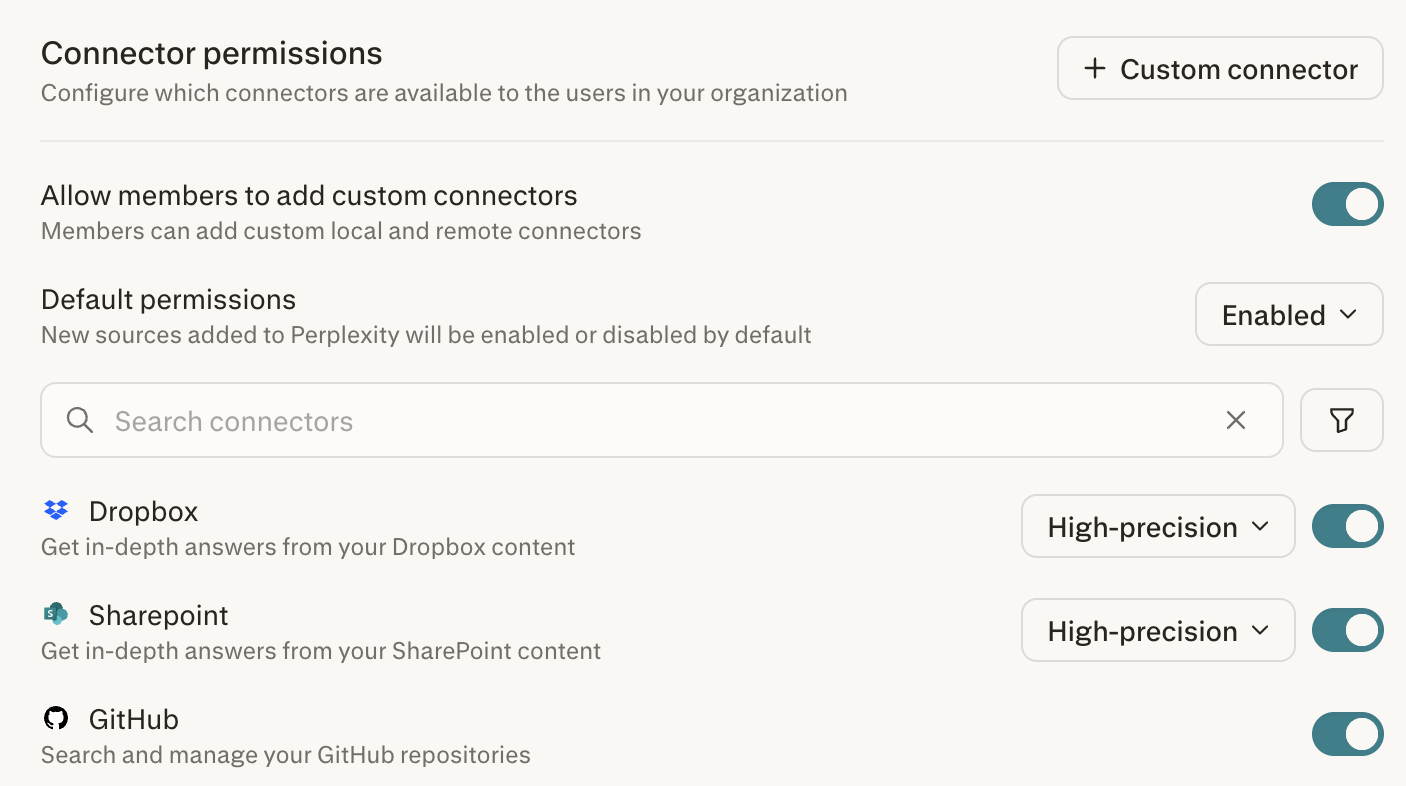
Allow members to add custom connectors — Use this toggle to control whether non-admin members can add their own remote custom connectors. This is disabled by default.
Add organization-wide remote connectors — Add remote connectors that are shared with the entire organization.
These settings are accessible from Enterprise settings → Connectors under the Connector permissions section.
Security Considerations
Custom connectors introduce additional risks because Perplexity cannot verify third-party MCP servers or guarantee answer quality. Keep the following in mind:
Only use connectors from sources you trust. Perplexity is not responsible for issues caused by custom connectors.
Remote MCP server URLs must use HTTPS.
Users can edit or delete only their own connectors. Admins can manage organization-wide connectors.
If server validation fails during setup, the connector will show an error tag with a message prompting you to reconfigure it.
Admins should review member-added connectors and restrict or remove any that pose a security risk.